Clover Time Boss Guide and Verified Roster
Prepare for Clover Time bosses with the official seven-boss roster, verified Salik data, and a safe strategy framework without fake drops.

What is actually verified about Clover Time bosses?
The official Trello Bosses list gives us a reliable roster boundary: Salik, Earth Bandit Boss, Mana Wolf, Zora, Fire Mage Boss, Heart Grice, and Magna Swing. Those spellings are reproduced exactly here, including Heart Grice. A name on the list verifies that roster entry; it does not automatically verify a location, attack pattern, weakness, reward, or recommended build.
| Official roster name | Detail this guide can publish |
|---|---|
| Salik | The official card lists 2,250 HP |
| Earth Bandit Boss | Name verified; comparable details remain unverified |
| Mana Wolf | Name verified; comparable details remain unverified |
| Zora | Name verified; comparable details remain unverified |
| Fire Mage Boss | Name verified; comparable details remain unverified |
| Heart Grice | Name verified; comparable details remain unverified |
| Magna Swing | Name verified; comparable details remain unverified |
The roster graphic gives every name equal visual weight and keeps the Trello order. It is a reference card, not a difficulty ranking. Salik’s verified HP appears because a primary card supports it; blank details for the other entries mean “not verified here,” not zero, none, easy, or impossible.
What does Salik’s verified HP tell you?
Salik’s official Trello card records 2,250 HP. That is the only quantified boss stat used in this guide. It can identify the correct source record and set a publication baseline, but by itself it cannot tell you how difficult the encounter feels, how long a fight should last, which Grimoire is best, or what a successful squad must bring.
Salik encounter details, location, and confirmed drop rates
The official developer card for Salik (Chain Bandit) specifies exact encounter parameters and item drop chances for successful completions:
| Parameter or Drop | Official Source Value | Tactical Note |
|---|---|---|
| Encounter Zone | Ruins (♦︎Ruins♦︎) | Dilapidated stone pillars northeast of Hage Village |
| Prerequisite Quest | Cole Quest (Level 20) | Assigned by NPC Cole in the vicinity |
| Boss Health | 2,250 HP | Scaled up from 1,500 HP in earlier beta patches |
| Salik Outfit | 30% Drop Chance | Signature bandit armor boosting defense |
| Chain Fragment | 15% Drop Chance | Bundles of 2 to 5 crafting fragments |
| Salik Cloak | 12% Drop Chance | Back accessory aiding stamina recovery |
| Normal Chest | 9.5% Drop Chance | Contains gold and potential progression spins |
| Chain Hand (WIP) | 3% Drop Chance | Rare specialized chain melee weapon |
| Iron Scythe | 2% Drop Chance | High-tier melee weapon with sweeping reach |
Do not stretch one verified value into a full strategy. Effective health could be affected by mechanics that this guide has not verified, while a player’s results could vary with their own kit and execution. The honest use of the HP figure is narrow: quote it as Salik’s sourced stat, then observe the live encounter instead of pretending the number proves everything else.
How should you prepare before an attempt?
The official experience description says Magic Squads can team up to defeat bosses. It does not publish one mandatory composition or universal preparation route, so the checklist below is editorial guidance for making an attempt easier to learn from, not an official requirement.
- Confirm that every participant is ready and knows which encounter the group intends to try.
- Test movement and the spells you plan to use somewhere that does not put the attempt at risk.
- Agree on short, plain callouts for starting, backing away, regrouping, and ending an attempt.
- Decide what observation would make the attempt useful even if the squad does not win.
- Keep enough attention free to notice what happens instead of pressing every available action at once.
- Check the live game or a current primary source rather than relying on a remembered route or copied claim.
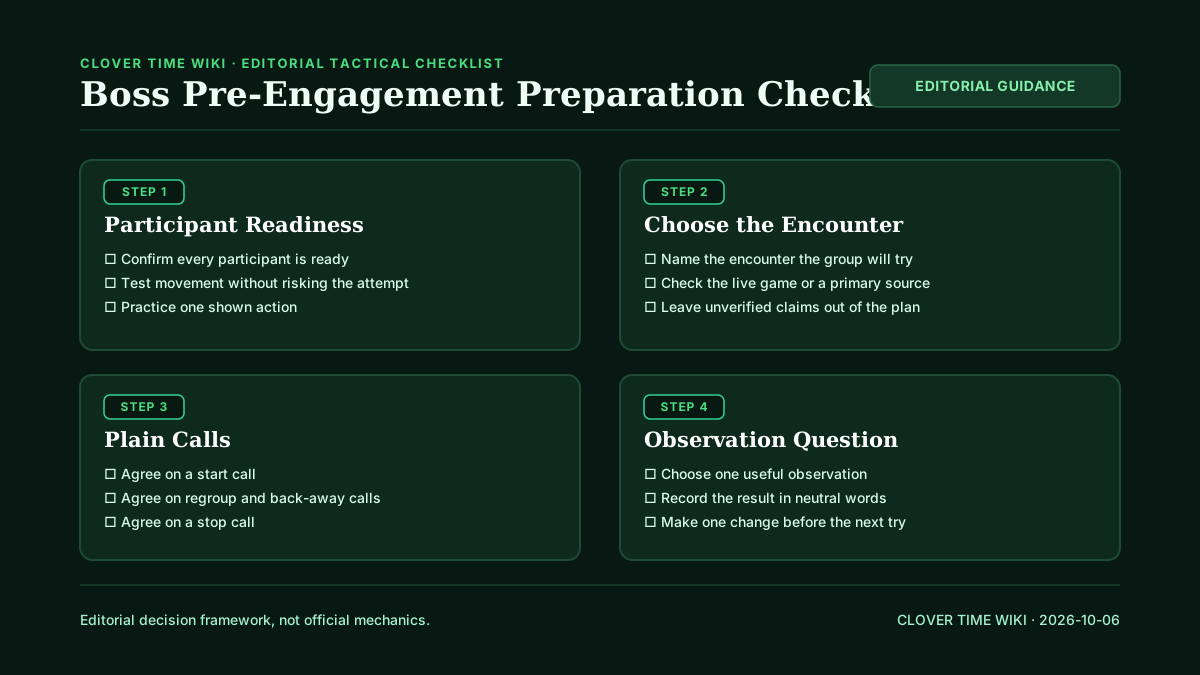
Preparation should reduce confusion, not manufacture certainty. If the squad cannot verify a claimed weakness, special trigger, or required item, leave it out of the plan and collect direct observations first. A simple plan that everyone understands is more useful than a complicated plan built from rumors.
The beginner guide can help a newer player organize early combat practice, while the Grimoire roster explains why this wiki does not present an unsupported universal best build. Use those pages to frame learning decisions, not to infer a boss-specific counter that has not been sourced.
Which squad roles are useful for learning?
Because squad boss play is an advertised feature, players may reasonably coordinate before an attempt. The following roles are purely editorial communication jobs. They are not classes, hidden game roles, or claims that Clover Time uses a particular targeting system.
| Editorial role | Job during the attempt | What the role must not assume |
|---|---|---|
| Caller | Announces the agreed start, regroup, and stop calls | That a specific cue always predicts a specific move |
| Observer | Watches one chosen question and records only what was seen | That one attempt proves a permanent mechanic |
| Pace keeper | Reminds the group not to rush an unclear situation | That slower or faster play is universally optimal |
| Recorder | Writes the result and the next proposed change | That correlation proves why the result happened |
One player can handle several jobs, or a larger group can split them. The point is not to build a rigid composition. The point is to prevent everyone from watching the same obvious event while nobody records the condition that preceded it. Rotate jobs when useful so that observations do not depend on one person’s viewpoint.
How do you use the observation worksheet?
Before the pull, choose a narrow question that can be answered by watching: what visible or audible cue appeared before an event, where each player was standing, what action the group took, and what happened next. Write observations in neutral language. “The boss turned toward the player near the doorway” is a record; “the boss always targets the nearest player” is an unverified mechanic claim.
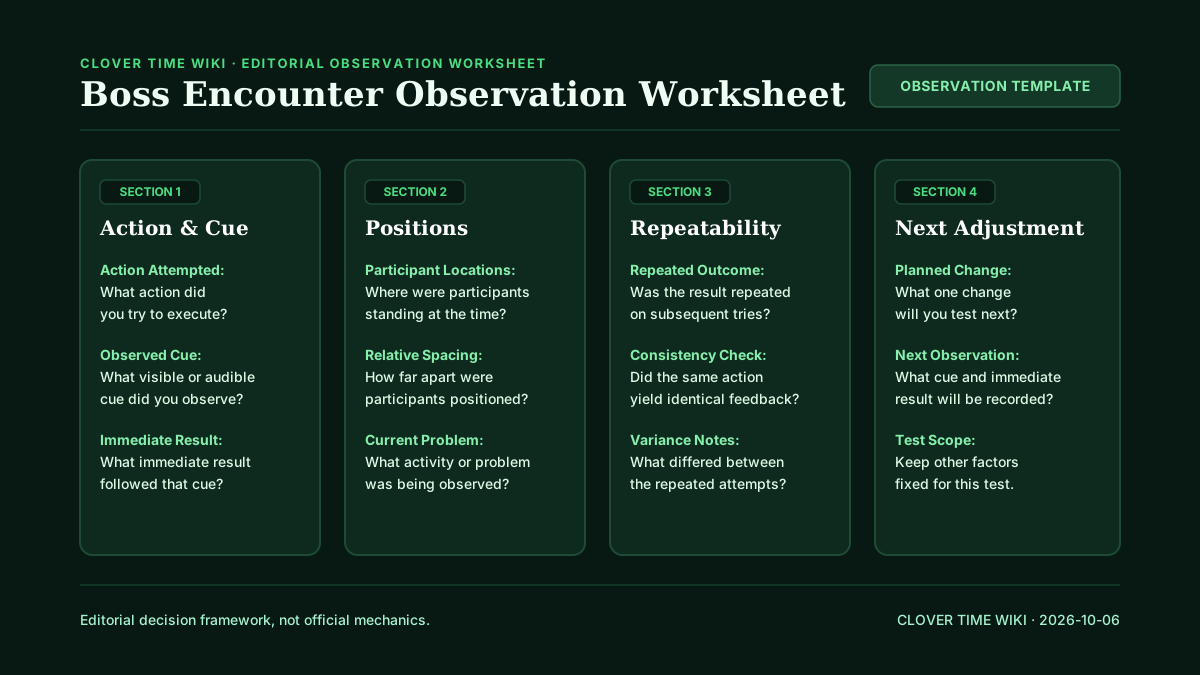
- Encounter: copy the exact roster name so notes from different bosses do not get mixed together.
- Starting state: note the squad setup in ordinary words without claiming that it is optimal.
- Observed cue: describe only what could be seen or heard, including uncertainty when views disagree.
- Action and result: record what the squad tried and the immediate outcome without assigning a cause too early.
- Confidence: distinguish a single observation from something seen repeatedly under similar conditions.
- Next adjustment: change one understandable part of the plan so the next attempt can answer a clearer question.
After the attempt, compare notes before choosing a theory. If accounts conflict, preserve the conflict instead of voting a mechanic into existence. Repeating an observation under similar conditions can improve confidence, but this guide still will not publish it as official without suitable evidence. The gallery’s attempt loop summarizes that cautious process.
What remains unknown about boss locations?
While Salik’s spawn is documented at the Ruins, this guide does not publish a speculative map coordinate for all other roster entries. The evidence ledger maintains strict claim-by-claim standards, and developer cards for the remaining six bosses continue to evolve across updates. Verify navigation in the live game before leading a squad, and treat old community maps as editorial estimates until verified.
“Location unverified” means this article only publishes locations with direct card backing (such as Salik’s Ruins card). That boundary prevents leading readers to the wrong areas while still delivering the confirmed encounter data above.
What remains unknown about boss mechanics?
Beyond Salik’s recorded HP and confirmed drop pool, no universal developer spreadsheet currently lists full resistance percentages or precise phase intervals for the entire roster. Therefore, general combat tips are labeled as squad recommendations rather than rigid developer mechanics.
Questions on the worksheet are observation prompts, not spoilers disguised as facts. If a prompt asks about a cue, interruption, recovery window, or reset, it asks the player to look for evidence in their own attempt. It does not assert that every boss has that behavior, or that an observed behavior will remain unchanged after an update.
What remains unknown about drops and rewards?
Outside of Salik’s official drop rates (30% Outfit, 15% Chain Fragment, 12% Cloak, 9.5% Chest, 3% Hand, 2% Scythe), drop tables for the other six bosses are not officially quantified on Trello. Rather than inventing fake percentage rates, we label those drops as community observations until official drop tables are published.
Check the FAQ for the site’s official-link policy and the codes page for another example of separating volatile claims from confirmed records. If a future primary source supports a reward, the responsible update is to add the bounded claim with its access date, not to backfill an entire table from memory.
What should you change after a failed attempt?
Start with the smallest change that tests the clearest observation. The squad might simplify a callout, assign a different observer, wait for a clearer cue, or stop repeating an action whose result nobody can explain. Keep the rest of the plan stable enough that the next result remains understandable.
Avoid panic rerolling or spending solely because an early attempt went badly. A failure can come from execution, communication, an incorrect assumption, or an unobserved condition; this guide has no verified basis for naming the cause in advance. Record what happened, select one editorial adjustment, and try again only when the group is ready.
That loop is intentionally modest: prepare, observe, record, adjust. It works without invented boss lore, preserves uncertainty when the evidence is incomplete, and gives the squad a concrete next action. Most importantly, it keeps a useful player worksheet separate from the official facts this page can defend.
Sources
- Official Clover Time Trello board, including its Bosses list, accessed October 6, 2026.
- Official Salik Trello card, accessed October 6, 2026.
- Official Clover Time Roblox page, accessed October 6, 2026.
- Original diagrams were created by Clover Time Wiki for this guide.
Gallery
Related Articles
beginner-guide
Clover Time Beginner Guide
Start Clover Time with a source-backed plan for Grimoires, spells, broom travel, squads, bosses, and AFK rewards without invented mechanics.
codes
Clover Time Codes (October 2026) — Active Rewards
All active Clover Time codes on Roblox for free spins, reset stats, and chests. Sourced from the official Trello with verified redemption steps.
grimoire-tier-list
Clover Time Grimoire Tier List and Roster
See the verified Clover Time Grimoire roster, what official sources actually confirm, and why unsupported rarity or power rankings are excluded.
Was this helpful?
Thanks for the feedback!